Serve PyTorch MNIST Model
In this tutorial, we will serve a PyTorch MNIST model.
It receives a Base64 encoded image as request data, and return the prediction in the response.
Prerequisite
Visit PyTorch Examples - MNIST, download the files.
Run below commands to install and train the model:
pip install -r requirements.txt
python main.py --save-model
After the training is finished, you will have a folder structure as below. A mnist_cnn.pt file is created
.
├── README.md
├── main.py
├── mnist_cnn.pt
└── requirements.txt
Deploy Methods
There are two methods you can deploy the model.
- Directly register a function.
- Only register a model path, with an additioanl handler.
We will cover both methods step by step in this tutorial.
Directly Register a Function
Create the App
Let's create a file func_app.py in the same folder.
| func_app.py | |
|---|---|
1 2 3 4 5 6 7 8 9 10 11 12 13 14 15 16 17 18 19 20 21 22 23 24 25 26 27 28 29 30 31 32 33 34 35 36 37 38 39 40 41 42 | |
- Make suer you can import the Net Model.
- Preprocessing transformation codes.
- The example script only save the
state_dict. Here we need to initialize the model and load thestate_dict. - Get ready, 3, 2, 1. GO!
Start the Service
$ uvicorn func_app:service --reload
INFO:     Uvicorn running on http://127.0.0.1:8000 (Press CTRL+C to quit)
INFO:     Started reloader process [xxxxx] using statreload
INFO:     Started server process [xxxxx]
INFO:     Waiting for application startup.
INFO:     Application startup complete.
$ pinfer func_app:service --reload

Pinferencia: Frontend component streamlit is starting...
Pinferencia: Backend component uvicorn is starting...
Test the Service
Test Data?
Because our input is a base64 encoded MNIST image, where can we get these data?
You can make use of PyTorch's datasets. Create a file with in the same folder named get-base64-img.
import base64
import random
from io import BytesIO

from PIL import Image
from torchvision import datasets

dataset = datasets.MNIST( # (1)
    "./data",
    train=True,
    download=True,
    transform=None,
)
index = random.randint(0, len(dataset.data)) # (2)
img = dataset.data[index]
img = Image.fromarray(img.numpy(), mode="L")

buffered = BytesIO()
img.save(buffered, format="JPEG")
base64_img_str = base64.b64encode(buffered.getvalue()).decode()
print("Base64 String:", base64_img_str) # (3)
print("target:", dataset.targets[index].tolist())
- This is the MNIST dataset used during training.
- Let's use a random image.
- The string and the target are printed to stdout.
Run the script and copy the string.
python get-base64-img.py
Output:
Base64 String: /9j/4AAQSkZJRgABAQAAAQABAAD/2wBDAAgGBgcGBQgHBwcJCQgKDBQNDAsLDBkSEw8UHRofHh0aHBwgJC4nICIsIxwcKDcpLDAxNDQ0Hyc5PTgyPC4zNDL/wAALCAAcABwBAREA/8QAHwAAAQUBAQEBAQEAAAAAAAAAAAECAwQFBgcICQoL/8QAtRAAAgEDAwIEAwUFBAQAAAF9AQIDAAQRBRIhMUEGE1FhByJxFDKBkaEII0KxwRVS0fAkM2JyggkKFhcYGRolJicoKSo0NTY3ODk6Q0RFRkdISUpTVFVWV1hZWmNkZWZnaGlqc3R1dnd4eXqDhIWGh4iJipKTlJWWl5iZmqKjpKWmp6ipqrKztLW2t7i5usLDxMXGx8jJytLT1NXW19jZ2uHi4+Tl5ufo6erx8vP09fb3+Pn6/9oACAEBAAA/APn+uhfwXqy2Ph25VYnPiB3SzhUkPlXCfNkAAEsCCCeOeKx9RsLjStUu9Ou1C3NpM8Eqg5AdSVIz35FVqK9xl0HXhb/C20sdMubjTLMQXs11AhkRXmmDsCwzgAYPpz+XI/GrSLrTfiVqNzPapbw3xE8AWQNvUAKXOOmWVjg+teeUV2fgXxd4hsPE2hWEGuX8Vh9uhja3Fw3lbGcBhtzjGCad8XI7iL4p68twHDGcMm45+QqCuPbBFcVRRU97fXepXb3d9dT3VzJjfNPIXdsAAZY8nAAH4VBX/9k=
target: 4
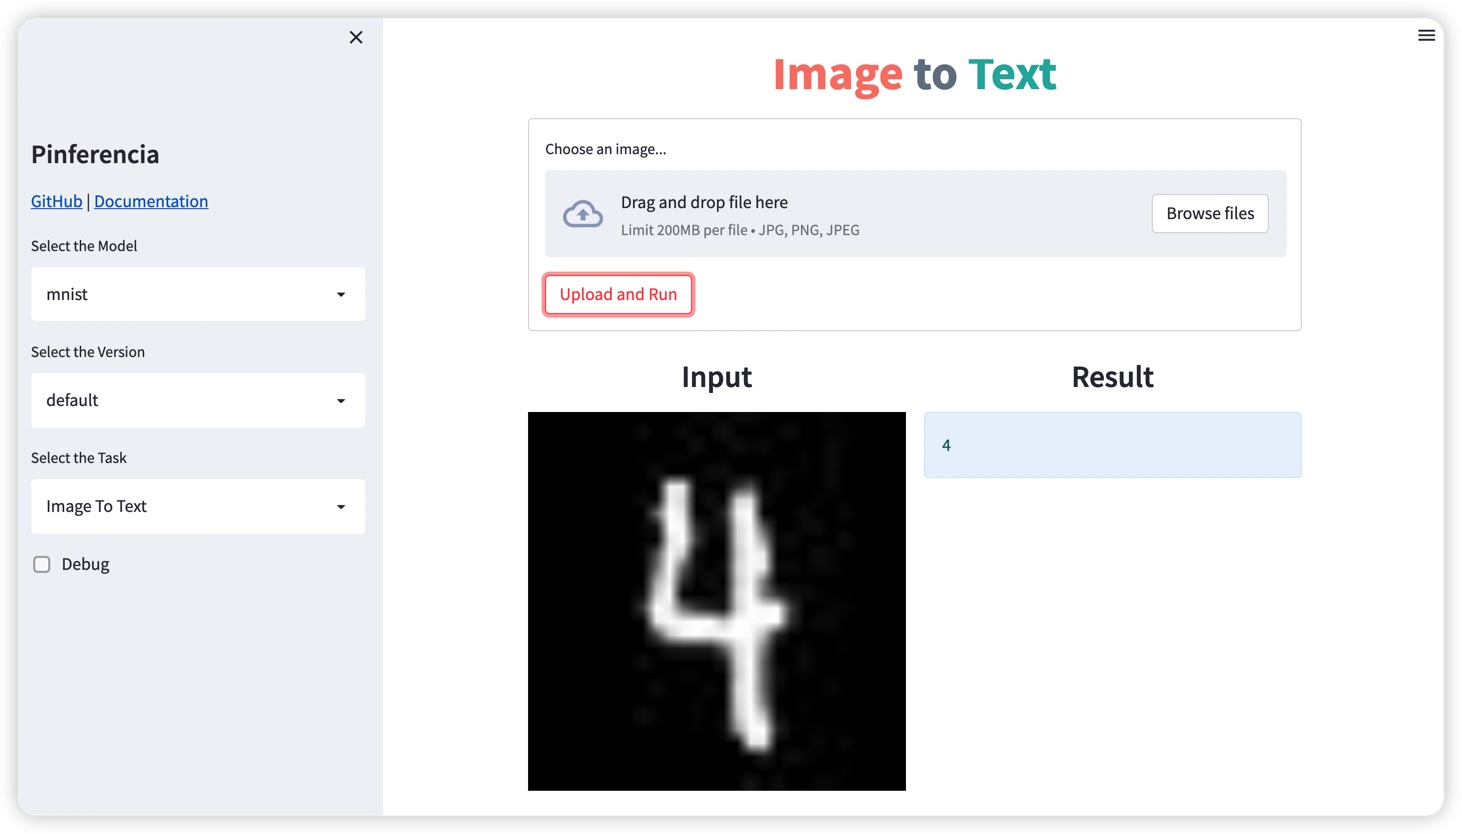
Frontend UI
Open http://127.0.0.1:8501, and the template Image to Text will be selected automatically.
Use the image below:

You will get:
Backend API
Let's create a file test.py
| test.py | |
|---|---|
1 2 3 4 5 6 7 | |
Run the test:
$ python test.py
Prediction: 4
You can try out the API with more images, or even using the interactive API documentation page http://127.0.0.1:8000
Register a Model Path, with a Handler
Handler
If you prefer the old classical way of serving a model with a file, using a handler is your choice.
For details of handlers, please visit Handlers
Create the App
Let's create a file func_app.py in the same folder.
The codes below are refactored into a handle class. It looks cleaner!
| path_app.py | |
|---|---|
1 2 3 4 5 6 7 8 9 10 11 12 13 14 15 16 17 18 19 20 21 22 23 24 25 26 27 28 29 30 31 32 33 34 35 36 37 38 39 40 41 42 43 44 | |
-
We move the codes of loading the model into the
load_modelfunction. The model path can be accessed byself.model_path. -
We move the codes of predicting into the
predictfunction. The model can be accessed byself.model. -
model_diris wherePinferenciawill look for your model files. Set the model_dir to the folder having themnist_cnn.ptand this script. -
load_nowdetermine if the model will be get loaded immediately during registration. The default isTrue. If set toFalse, you need to call theloadAPI to load the model before prediction.
Start the Service
$ uvicorn func_app:service --reload
INFO:     Uvicorn running on http://127.0.0.1:8000 (Press CTRL+C to quit)
INFO:     Started reloader process [xxxxx] using statreload
INFO:     Started server process [xxxxx]
INFO:     Waiting for application startup.
INFO:     Application startup complete.
$ pinfer func_app:service --reload

Pinferencia: Frontend component streamlit is starting...
Pinferencia: Backend component uvicorn is starting...
Test the Service
Run the test:
$ python test.py
Prediction: 4
No suprise, the same result.
Finally
Using Pinferencia, you can serve any model.
You can load the models by yourself, just what you have done to do a offline prediction. The codes are already there.
Then, just register the model using Pinferencia, and your model is alive.
Alternatively, you can choose to refactor your codes into a Handler Class. The old classic way also works with Pinferencia.
Both worlds work for your model, classic music and rock'n'roll.
Isn't it great!
Now you have mastered how to use Pinferencia to:
- Register any model, any function and serve them.
- Use your custom handler to serve your machine learning model.